How to Remove Tint From Car Windows
Window tinting can enhance the aesthetic appeal of a vehicle, provide privacy, and protect against harmful UV rays. However, over time, tinted windows may become discolored, bubbled, or scratched, prompting car owners to consider removing the tint altogether. Whether it’s due to changes in state regulations, a desire for a different look, or simply the natural degradation of the material, the process of removing tint from car windows can seem daunting. This comprehensive guide will walk you through the steps, methods, and tips to successfully remove window tint, ensuring a clear and polished appearance for your vehicle.
Understanding Window Tint
Before delving into the removal process, it is essential to understand what window tint is and how it works. Window tint is a thin film that is applied to the interior of car windows. It is designed to reduce glare, block harmful UV rays, and provide privacy. Window tint films are available in various shades and materials, including dyed, metalized, and ceramic films. Each type has its own unique properties and longevity.
Types of Window Tint
- Dyed Window Film: This film is made by layering dyed polyester, which absorbs solar heat and reduces glare. It is usually the most affordable option but has a shorter lifespan than other types.
- Metalized Window Film: This type includes tiny metal particles that reflect sunlight, providing excellent heat and glare reduction. However, it can interfere with electronic signals and may not be suitable for all vehicles.
- Ceramic Window Film: Offering the best performance in terms of heat and UV blockage, ceramic films are made from non-metallic materials. They are more expensive but provide superior clarity and longevity without interfering with electronic devices.
Reasons for Tint Removal
There are several reasons car owners might consider removing window tint:
- Discoloration: Over time, tinted windows may develop a faded or yellowish appearance, detracting from the vehicle’s aesthetics.
- Bubbles and Scratches: Poor installation or aging can cause bubbles to form under the tint, leading to a distorted view. Scratches can also occur, making the windows less appealing.
- Legal Compliance: Some states have strict regulations regarding the darkness of window tint. If a vehicle’s tint is no longer compliant, removal may be necessary.
- Change in Preference: A car owner might simply wish to change the look of their vehicle, opting for clear windows instead of tinted ones.
Tools and Materials Needed for Tint Removal
Before you start the removal process, gather the necessary tools and materials. Having everything on hand will make the task smoother and more efficient. Here’s a list of what you’ll need:
- Heat Gun or Hair Dryer: To soften the adhesive of the tint film.
- Utility Knife or Razor Blade: For cutting and peeling the film away.
- Spray Bottle: Fill this with soapy water or a solution of ammonia and water to help loosen the tint.
- Plastic Scraper: To gently lift the edges of the tint without damaging the glass.
- Microfiber Cloth: For cleaning the glass after the tint is removed.
- Gloves: To protect your hands from sharp edges and chemicals.
Step-by-Step Guide to Removing Window Tint
Step 1: Prepare the Vehicle
Before you begin, park your vehicle in a shaded area to prevent the heat from the sun from making the glass too hot. Excessive heat can make the removal process more difficult and may damage the windows or tint film. Ensure the interior of the vehicle is clean and clear of any unnecessary items to create a comfortable workspace.
Step 2: Use Heat to Soften the Tint
Using a heat gun or a hairdryer, apply heat to one corner of the tinted window. Hold the tool about 6 to 12 inches away from the surface, moving it back and forth to evenly distribute the heat. The goal is to soften the adhesive beneath the tint, making it easier to peel off. Be cautious not to overheat the glass, as this could cause it to crack.
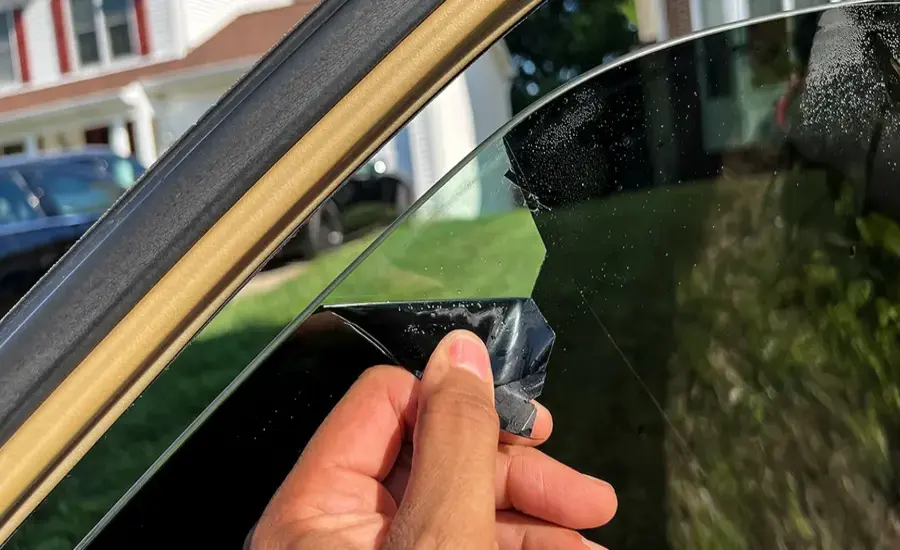
Step 3: Peel Off the Tint Film
Once the tint is sufficiently heated, use your utility knife or razor blade to gently lift one corner of the film. Start peeling it away slowly, pulling it at a 180-degree angle to the window. This angle reduces the risk of tearing the film and allows for a smoother removal process. If you encounter resistance, reapply heat to that area until the adhesive softens again.
Step 4: Apply Soapy Water or Ammonia Solution
As you peel off the tint, you may find that some adhesive remains stuck to the window. To tackle this, spray a mixture of soapy water or an ammonia solution onto the surface. Allow it to sit for a few minutes to penetrate and loosen the adhesive. Then, use the plastic scraper to gently scrape away the residue. Be careful not to scratch the glass while doing this.
Step 5: Clean the Window
After removing the tint and adhesive, it’s time to clean the window thoroughly. Use a microfiber cloth and glass cleaner to remove any remaining streaks or residues. This will restore clarity and shine to the glass, giving it a fresh look.
Step 6: Repeat the Process for All Windows
If you’re removing tint from multiple windows, repeat the above steps for each one. It’s often easier to work on one window at a time to ensure thorough removal without missing any adhesive residue.
Alternative Methods for Tint Removal
While the above method is effective, there are alternative techniques you might consider depending on your preferences and circumstances.
Steam Method
The steam method is another popular approach for removing window tint. It involves using a handheld steamer or a steam cleaner to loosen the adhesive. Here’s how to do it:
- Prepare the Steamer: Fill the steamer with water and allow it to heat up.
- Apply Steam: Hold the steamer close to the tinted window, applying steam to the film. Move slowly across the surface to ensure the adhesive softens.
- Peel and Scrape: After a few minutes of steaming, use the utility knife to lift a corner of the tint. Peel it away slowly and use the plastic scraper to remove any adhesive left behind.
Vinegar and Newspaper Method
This method is a more natural alternative, utilizing vinegar and newspaper to assist in tint removal. Here’s how it works:
- Create the Solution: Mix equal parts vinegar and water in a spray bottle.
- Soak Newspaper: Dip the newspaper in the solution and apply it directly to the tinted window, covering it completely.
- Wait and Peel: Allow the newspaper to sit for about an hour. The acidity of the vinegar helps to break down the adhesive. After waiting, peel away the tint film gently.
Safety Precautions
Removing window tint can be a straightforward process, but it’s important to take some safety precautions to avoid injuries or damage:
- Wear Protective Gear: Use gloves to protect your hands from sharp blades and adhesive. Safety glasses can also be helpful if you’re concerned about flying debris.
- Avoid Overheating: When using a heat gun or hair dryer, avoid keeping it too close to the glass for extended periods, as this can cause cracking or damage.
- Proper Ventilation: If you’re using ammonia or any other chemical solutions, ensure you’re working in a well-ventilated area to avoid inhaling fumes.
Maintaining Tint-Free Windows
After successfully removing the tint from your car windows, it’s essential to maintain their clarity and condition. Here are some tips:
- Regular Cleaning: Clean the windows regularly with a glass cleaner and microfiber cloth to prevent streaks and dirt buildup.
- Protect Against UV Rays: Consider applying a UV protective film or using sunshades when parking to protect the interior of your car from fading and damage.
- Avoid Chemical Exposure: Minimize exposure to harsh chemicals that may harm the glass or surrounding materials.
Conclusion
Removing tint from car windows can seem like a daunting task, but with the right tools and techniques, it can be accomplished effectively. Whether you choose to use heat, steam, or a vinegar solution, understanding the materials and processes involved is key to achieving a successful removal. Remember to take your time, work carefully, and follow the safety precautions to protect both yourself and your vehicle. Once completed, your windows will be restored to their original clarity, enhancing the overall appearance of your car.
FAQs:
Yes, you can re-tint your windows after removing the old tint. However, it is advisable to wait a few days to ensure that any residual adhesive or moisture has completely dried before applying new tint.
If old window tint is not removed, it can degrade over time, becoming discoloured, bubbled, or scratched. This not only detracts from the vehicle’s appearance but can also reduce visibility and safety while driving.
If you’re unsure about the removal process or lack the necessary tools, hiring a professional can save you time and potential damage to your vehicle. Professional services often have the experience and equipment to remove tint safely and effectively.
Yes, aside from heat and chemical solutions, you can use steam or a vinegar and newspaper method for tint removal. Each method has its own advantages, so you can choose based on your preference and the tools you have available.