How to Add Different Color Text to 3D Print: A Comprehensive Guide
3D printing has revolutionized the way we create and design objects, offering unprecedented freedom and creativity in manufacturing. One of the exciting aspects of 3D printing is the ability to add different colors to your prints, enhancing their aesthetic appeal and functional applications. Adding color text to your 3D prints can transform a simple object into a striking piece of art or a functional tool that stands out. This guide delves into the techniques, materials, and best practices for incorporating different color text into your 3D printed projects.
Understanding 3D Printing and Color Addition
3D printing, or additive manufacturing, involves creating a three-dimensional object from a digital file by adding material layer by layer. There are various methods and technologies involved in 3D printing, including Fused Deposition Modeling (FDM), Stereolithography (SLA), and Selective Laser Sintering (SLS). Each method has unique characteristics that can affect how colors are added to the final print.
Adding color text to a 3D print can be accomplished through several methods, depending on the capabilities of your 3D printer and the materials you use. Understanding these methods is crucial for achieving the desired outcome.
Types of 3D Printing Technologies
- Fused Deposition Modeling (FDM): FDM is one of the most common 3D printing methods, where thermoplastic filament is extruded through a heated nozzle and deposited layer by layer. FDM printers can create multi-color prints using multiple filaments or specialized techniques.
- Stereolithography (SLA): SLA printers use a UV laser to cure liquid resin into solid layers. While SLA can achieve high-resolution prints with intricate details, adding color usually involves painting or dyeing the final object.
- Selective Laser Sintering (SLS): SLS involves using a laser to fuse powdered material into solid forms. Similar to SLA, coloring options are more limited, typically requiring post-processing techniques for adding color.
The Importance of Color in 3D Printing
Color plays a vital role in design and communication. In 3D printing, it can enhance visibility, indicate functionality, and create a visually appealing product. Color-coded elements can help users understand the various components of a product or its intended use. For example, a multi-colored 3D printed prototype can better represent a final product’s features in presentations or marketing materials.
Techniques for Adding Color Text to 3D Prints
Adding different colors to text on your 3D prints can be achieved through various methods. Each technique has its advantages and drawbacks, depending on the project’s complexity, the printer’s capabilities, and the desired visual effect.
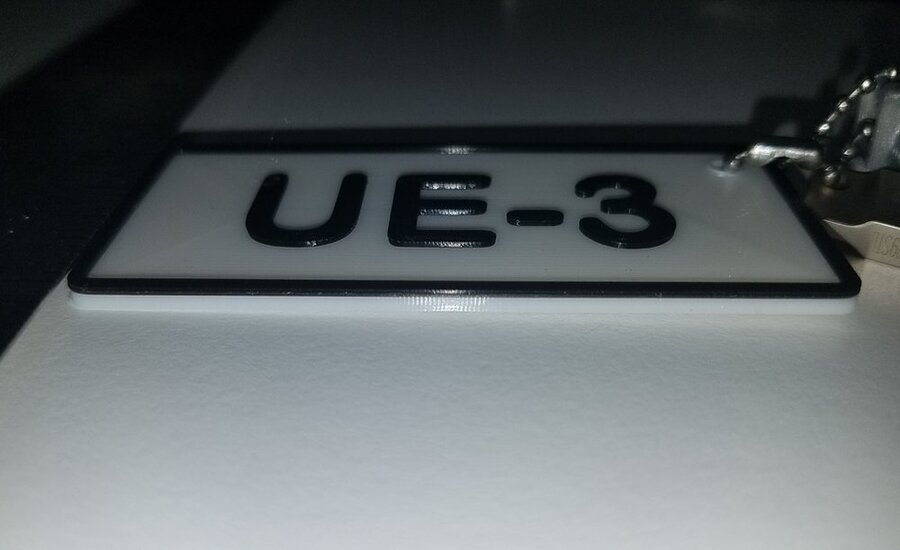
Method 1: Multi-Material Printing
Multi-material printing allows for the use of different filaments during the printing process, enabling users to create multi-colored prints seamlessly. This method is most effective with FDM printers designed for dual or multi-material printing.
Advantages:
- Seamless Integration: Multi-material printing allows for a natural blending of colors without the need for post-processing.
- Complex Designs: This method can create intricate designs where text and shapes are interwoven in different colors.
Disadvantages:
- Printer Limitations: Not all FDM printers are equipped for multi-material printing. Ensure that your printer supports this feature before proceeding.
- Filament Compatibility: The filaments used must be compatible with each other to avoid printing issues.
Steps for Multi-Material Printing:
- Design Preparation: Using software like Tinkercad, Fusion 360, or Blender, design your object and specify the color for the text.
- Slicing Software: Use slicing software (like Cura or PrusaSlicer) that supports multi-material printing. Assign different materials to different parts of your design.
- Loading Filaments: Load the appropriate filaments into the printer’s extruders. Ensure they are primed and ready for use.
- Printing Process: Start the printing process. Monitor the print to ensure that the filaments are being used correctly.
Method 2: Painting and Post-Processing
If your printer does not support multi-material printing or if you want to add color text after printing, painting is a viable option. This method involves printing the object in a single color and then adding paint or other coloring agents to the text.
Advantages:
- Cost-Effective: Painting can be more affordable than investing in a multi-material printer.
- Customization: Users can choose any color or texture they desire, allowing for extensive customization.
Disadvantages:
- Time-Consuming: This method can be labor-intensive, requiring drying time and multiple coats of paint for optimal coverage.
- Durability Concerns: Depending on the paint used, the color may not adhere well to the printed material, leading to potential wear and tear.
Steps for Painting Text on 3D Prints:
- Design Preparation: Print your object in a neutral color that contrasts with the text color you plan to apply.
- Surface Preparation: Clean the printed surface to remove any dust or debris. Lightly sand the area where you will apply the text for better paint adhesion.
- Painting Process: Use fine-tipped brushes or paint pens to carefully apply paint to the text. Alternatively, consider using stencils for more intricate designs.
- Finishing Touches: After the paint has dried, consider applying a clear coat for added durability.
Method 3: Dual Extruder Printing
Dual extruder printing is similar to multi-material printing but focuses specifically on using two filaments to create distinct color effects. This method can produce intricate designs with precision and clarity.
Advantages:
- High Precision: Dual extruder setups provide precise control over where colors are applied.
- Better Detail: This method allows for more detailed designs, making it suitable for complex text elements.
Disadvantages:
- Technical Challenges: Dual extruder setups can be more complex to calibrate and operate, requiring advanced knowledge of 3D printing.
- Increased Cost: Printers with dual extruder capabilities are often more expensive than single-extruder models.
Steps for Dual Extruder Printing:
- Design Preparation: Create your design, specifying which parts will be printed in each color.
- Slicing Software Configuration: Use compatible slicing software to set up the dual extruder configurations and ensure correct filament assignments.
- Calibration: Ensure both extruders are calibrated correctly for consistent material flow.
- Printing Process: Start the print and monitor both extruders to ensure they operate smoothly.
Method 4: Filament Swapping
Filament swapping is a manual technique where the user changes the filament color partway through the print. This method is suitable for simple text designs where only a portion of the object requires a different color.
Advantages:
- Simple Setup: Filament swapping does not require advanced printer features, making it accessible for most FDM printers.
- Creative Freedom: Users can create unique patterns and color transitions in their prints.
Disadvantages:
- Requires Timing: The user must monitor the print and manually change the filament at the right time, which can be challenging for larger projects.
- Potential for Errors: Improper timing can lead to color bleeding or incorrect filament usage.
Steps for Filament Swapping:
- Design Preparation: Print the base of your object in the primary color.
- Slicing Setup: Configure your slicer to indicate the layer at which you will swap the filament.
- Monitoring the Print: Keep an eye on the print progress, pausing when you reach the designated layer.
- Filament Change: Change the filament to the desired color, then resume printing.
Choosing the Right Materials
When adding color text to your 3D prints, selecting the right materials is critical for achieving the desired results. The choice of filament or paint can significantly affect the print’s quality, durability, and aesthetic appeal.
Common Filament Types
- PLA (Polylactic Acid): A popular filament known for its ease of use and vibrant colors. PLA is biodegradable and ideal for beginners. However, it may not be suitable for high-temperature applications.
- ABS (Acrylonitrile Butadiene Styrene): Known for its strength and durability, ABS is commonly used for functional parts. However, it requires a heated bed and good ventilation due to fumes.
- PETG (Polyethylene Terephthalate Glycol-Modified): PETG combines the ease of PLA with the durability of ABS. It is resistant to impact and moisture, making it suitable for various applications.
- TPU (Thermoplastic Polyurethane): A flexible filament ideal for producing rubber-like parts. TPU can be used for text that requires a soft touch or flexibility.
Choosing the Right Paints
When painting your 3D prints, selecting high-quality paints designed for plastics can significantly enhance your project’s durability and appearance. Some popular paint options include:
- Acrylic Paints: Fast-drying and easy to apply, acrylic paints work well on various surfaces, including 3D prints. They can be diluted for airbrush applications or used directly for brushwork.
- Spray Paints: Offering even coverage and quick application, spray paints are ideal for larger prints or full-color finishes. Ensure you choose paints that adhere well to plastic materials.
- Specialty Paints: Consider using specialty paints, such as metallic or glow-in-the-dark options, to add unique effects to your printed text.
Preparing Your Work Environment
Before you start the printing or painting process, ensuring you have a clean, well-lit workspace is essential. A tidy area helps prevent dust and debris from contaminating your prints or paints. Consider the following tips for preparing your workspace:
- Ventilation: If using paints or solvents, ensure adequate ventilation to avoid inhaling fumes. Working outside or in a well-ventilated room can help.
- Lighting: Good lighting is essential for accurately seeing colors and details while working. Ensure your workspace is well-lit to avoid mistakes.
- Tools and Equipment: Gather all necessary tools, such as brushes, stencils, and cleaning supplies, before starting your project. This preparation can help streamline your workflow.
Best Practices for Color Text in 3D Printing
To achieve the best results when adding color text to your 3D prints, consider the following best practices:
Design Considerations
- Font Selection: Choose bold and simple fonts that are easy to read and print. Avoid intricate designs that may not translate well in 3D.
- Text Size: Ensure the text is large enough to be legible but not so large that it disrupts the overall design.
- Positioning: Consider the placement of text within the design. Text that is too close to edges or corners may be more prone to damage during printing.
Testing and Iteration
- Test Prints: Conduct test prints to ensure the colors and designs work as intended. Small prototypes can help identify potential issues before committing to a full-scale print.
- Iterate on Designs: Don’t be afraid to make adjustments to your designs based on test results. Iteration is an essential part of the design process.
Maintenance and Care
- Cleaning Your Printer: Regular maintenance of your 3D printer is crucial for optimal performance. Ensure that no filament residue or debris affects the printing process.
- Storing Filaments Properly: Store filaments in a cool, dry place to prevent moisture absorption, which can affect print quality.
Conclusion
Adding different color text to your 3D prints can significantly enhance their visual appeal and functionality. Whether using multi-material printing, painting, dual extruder techniques, or filament swapping, each method offers unique advantages and challenges. By understanding these techniques and following best practices, you can create stunning 3D printed objects that stand out and effectively communicate their intended message.
As technology continues to evolve, the possibilities for color integration in 3D printing will only expand, allowing for even greater creativity and innovation in your projects. Embrace these techniques, experiment with different materials, and let your imagination guide you in creating remarkable multi-colored 3D printed pieces that reflect your vision and style.


